The basics of picture viewing, including opening files, zooming, and scrolling, have already been covered in The Picture Window, so I'll just summarize and add a few specific details here. Pictures can be opened using the Open menu comand, or by selecting an item in either a file list, or a collection list.
You can also drag and drop image files onto the PicTracker icon. To make PicTracker the default application for a particular file type, select an image file in the Finder, and choose the Get Info command. Then set the options to open the file with PicTracker, and to use PicTracker to open all similar documents. You will then be able to double-click on an image file and have it open in PicTracker.
Basic navigation within a folders or file lists is easy, here is a summary:
Next - Mouse Click, Down Key, Right Key, or Right Arrow Icon
Previous - Mouse Option-Click, Up Key, Left Key, or Left Arrow Icon
Modifying the above by holding down Shift will increment by 10. The Home key jumps to the first, the End key to the last, and Page Up and Page Down keys increment by 10.
Modifying by holding down Command will move in to or out of a folder, similar to keyboard navigation in the Finder. Using this technique you can quickly naviagate through multiple folders.
Rotate Right does a 90° clockwise rotation, and Rotate Left a 90° counterclockwise rotation. Flip flips the image horizontally, creating a mirror image. These transformations are done during display only, and do not effect the images. PicTracker will remember the transformations until you leave the current folder, and will save the transformations in collection lists.
When viewing files from a collection list, you may find the file path grayed out, and that the pictures do not display. This means that the original path to the file is no longer valid. Either the file has been moved or renamed, a folder it resides in has been moved or renamed, or they are on a removable drive that is not mounted. In most cases this is easily remedied by locating the collection folder with the Collection Folder command or toolbar icon.
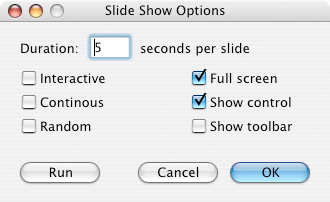
Running a slide show can be as simple as opening a picture from a folder and selecting the Slide Show command. They can also be run from file lists, or collection lists. The Slide Show Options command displays this dialog:
Duration - Number of seconds each slide is displayed.
Interactive - The slides will not automatically advance. Use the normal commands or the control.
Continuous - Continuous repetition of the slide show.
Random - Show each slide once in random order.
Full screen - Display full screen with no visible menubar.
Show control - The slide show control will be displayed.
Show toolbar - The toolbar will be displayed.
Duration - Number of seconds each slide is displayed.
The slide show control looks like this:
The green light is the Play button, which turns amber for Pause. Red is the Stop button. The arrow icons function as usual, and First and Last icons are included. From the keyboard, press Spacebar to pause, and Esc to stop. If you need to skip ahead while the show is running, click Next. To go back, press Pause first and then Previous.
As we have seen, the file window is a useful tool for sorting through a folder of image files. Open a folder with the Open Folder command, and use the menu commands Move Files, Copy Files, Move To Trash, and Rename Files to organize your pictures.
Collection lists provide additional tools for organization, including setting up slide shows, making indexes for collections burned to CD or DVD, and file verification.
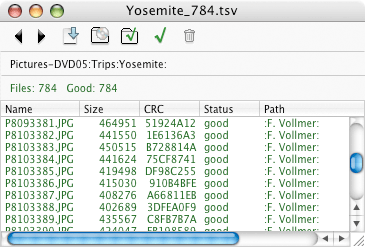
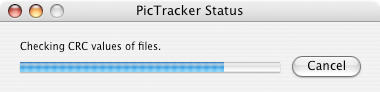
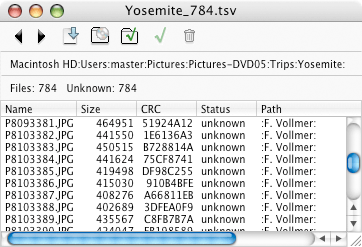
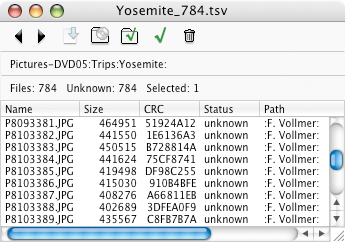
Creating a Collection List - Open a folder of files in the file window and select Save As. PicTracker will first calculate the CRC (Cyclic Redundance Code) for each file. This can take a few minutes for a large collection, open the status window (Window Status) to see the progress.
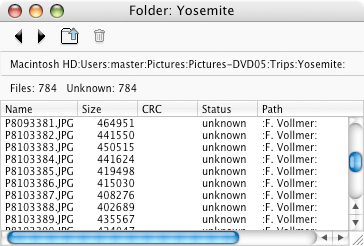
When complete, open the saved list and check that it can be used to view the collection. Here is a view of a file list and the collection list generated from it.
The saved list serves as a collection index, and can be used as is or edited to run a slide show or for other purposes.
Making a Disc Index - In the previous example a collection list was generated for a collection located on a hard drive. By specifying a burn folder the collection list can also be used as a disc index to view the files after burning to a CD or DVD. Here we have selected the folder Pictures-DVD05 as the burn folder.
If we now burn a DVD using this folder as the DVD, so Pictures-DVD05 is the title of the DVD, and include the collection list on the CD, it can be opened in PicTracker and will link to the picture files on the DVD.
File Verification - If a collection list is generated for a set of files, it is possible to verify the file collection's integrity after copying, burning or electronically transfering the files. It is also possible to restore file names, and even the directory structure.
For this example, assume that the picture files are in a temporary directory, renamed and unorganized. Open the folder containing the unorganized files to be verified, open the collection list, and select the Verify command. Select a new collection folder to hold the verified files, choose Move verified files, Rename files, and Create paths as options, and press Verify.
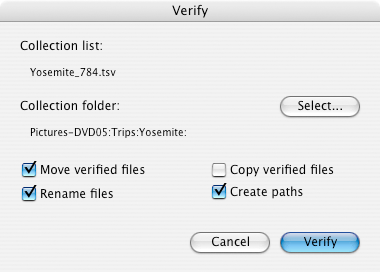
PicTracker will then rename any incorrectly named files, regenerate the folder structure, and move the files into the correct folders. It the files are already correctly named and located in the correct folders, you can use the Reverify command instead to double check the file integrity.